FINALLY!!
THE WHIPPLE INSTRUCTIONAL VIDEOS!!!
What is a Whipple Inductor? Part 1 www.dandy-job.com
How to Install a Whipple! part 2, www.dandy-job.com
The Whipple Extra Mods! Part 3, www.dandy-job.com
I'm Making my own Wahs Now!!!!!
Check out that cool logo, made by Eric Haze.
www.interhaze.com
"yo Brooklyn!"
The Whipple:
This product is running in tandem with my personal quest for what I have always
heard as great wah tone. It has taken years of hard work and experimentation to get it right.
Now THE WHIPPLE can be purchased by anyone with ebay account. If you don't
use ebay you can contact me directly at dandy_job (at) yahoo (dot) com
Just look up "The Whipple" in the music instrument section and you will find THE
WHIPPLE.
This myspace page has been created to unite the ever expanding community of
Whipple users out there. Please send pictures of your installed Whipples, write me
and let me know what you think. Send me sound files and I will post them so every
one else can hear them!
Here is another Great Clip Thanks Andy!!
Whipple Installation:
The Whipple is compatible with many different wah pedals as stated in the listing, it
Fits, Crybaby, Vox, Fulltone, Meastro, Teese, Budda, and more.
Recommended Tool List
Screw Driver
Pliers
(possible socket wrench if you have newer crybaby)
Solder Iron
Solder
De-solder tool (vacuum pump or de-solder braid)
Cup of tea or coffee
Note: (Radio Shack sells a complete soldering kit that is great and comes with
every thing you need
soldering iron, solder, pliers, cutters, a poker thing, etc..and it costs like $20,you
can't beat that. If you are
just getting into DIY you don't need to spend $150 on a soldering iron, get the
thing from Radio Shack,
if you find yourself spending every free moment building with your soldering iron,
then you should get a better one,
baby steps)
Please take your time, do not break your wah.
If you have never done anything like this before, you really should.
It is alot of fun and will open up a whole world of new possibilities for you as a
guitarist. You might find yourself changing out pickups or even fixing a broken cord
or even a broken battery snap on that $300 super-blaster-boost. Or even building your
own super-blaster-boost for $40.
If you need help email me or if you know of someone that can help you, get them
to help.
Also, if you really cannot or do not have time, to install the Whipple, you can Mail either
your board or the whole Wah (which will cost a bit more in shipping) and I will install it for
you for a small fee. email me at
dandy(dot)job at gmail(dot)com
Step 1: Remove the old inductor:
You will need to open the bottom of the wah, typically there are four rubber feet on the bottom of
the wah with little screws. They can be taken off with a Phillips head screw driver or
just your fingers.
Once you have your wah open there are two options.
Some pedals have the jacks attached to the board some don't.
If your pedal does not have the jacks attached (older crybabies, most older wahs,
new boutique wahs)
all you need to do is remove the screws that hold the board to the chassis.
If your pedals does have the jacks attached to the board (newer crybabies) you will need
to either take a pair of pliers or even better a socket wrench and remove the nuts on the
jacks in order to pull the board out.
You do not need to completely remove the board in order to work on it.
You just need to be able to get to other side of the board where the solder attachments are.
Now that you can see both sides of the board, find the solder joints that attached the old
inductor. (usually looks like can, although there are many variations)
Heat up the joints with a solder iron, and remove the old solder, with a vacuum pump or
de-solder braid.
If you do a good job that sucker will just fall out.
Sometime, especially if there are four joints it is helpful to heat up one side (two
pins at a time) and
then the other side, and slowly work out the old inductor.
Ok, you have got the old inductor out.
Sip, the coffee, or tea
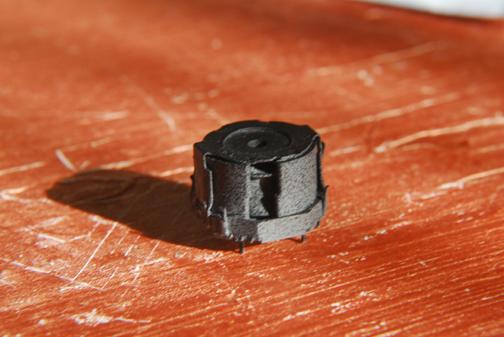
Step 2: Installing the WHIPPLE
Get familiar with the WHIPPLE. Take a good look at it. And look at the bottom you
will see some pins and numbers.
These numbers will help you to attach the correct pins.
The numbers read 1, 8, then 4, 5.
1 and 8 are the hot pins, these are the ones that need to be attached to the circuit.
4 and 5 do not serve any electrical function. If you have a board that has holes in it
to accommodate all the pins
you can solder them as a mechanical attachment.
In most cases 4 and 5 can simply be bend down and out of the way.
There is also a pin that is part of the clamp that holds everything together. That pin
can be bent out the way also.
Now there are two options. The old inductor will have either two or four pins.
If there where two pins, that is easy, attach 1 and 8 to the board just like the old inductor
If the old inductor had 4 pins it is a little more tricky.
You will need to look at the traces on the board and determine the best way to orient
the WHIPPLE so it completes the circuit. Another way to say this is, Pin 1 and 8 will
bridge the gap between the traces, (it is a beautifully thing)
In many cases the WHIPPLE's pin spacing will not match up with the old inductor's pins
Do not worry!
There are two easy ways to fix this.
A. The Super easy way is to attach one of the pins to the board and then run a
short jumper wire to the other pin.
This is where a needle nose pliers come in handy.
B. If you want to get a bit more advanced you could run two jumper from the
board and then bend the jumper wires
so they match perfectly with the WHIPPLE, and then solder everything together.
EXTRA CREDIT: IF you wanted to get Super PRO! you could use your drill press
with a 3/64'" drill bit and drill out 4 holes
in the board that match up with the WHIPPLE's pins, and then run jumpers as
needed. I'm not big fan
of drilling extra holes because unless you really know what you are doing you are
probably going to break something.
You get the idea.
At this point the inductor is attached.
Stretch, Sip.
If you want to experiment with putting in the resistor kit you could try it now.
OR
If you want hear what the new inductor sounds like with the stock resistors go on to step 3.
Step 3: Putting it back together
Put the board the board back in the wah, and screw in the board, and or, board and
jacks.
Close up the bottom
SOUND CHECK:
Plug in your new WHIPPLE wah and have at it.
You will notice and improved fidelity in the sound, warmer highs, richer clearer lows, vocal mids, and an
overall more expressive musical sound.
If your wah pedal sounds like a volume pedal, you have the inductor installed incorrectly.
Check all your joints, and make sure you have it oriented correctly.
If you can't figure out what the problem is email me at
dandy(dot)job at gmail(dot)com
RESISTOR KIT:
If you want to experiment further try installing the resistors and listen to how then
change the tone.
The instructions for those mods are located on this web site.
http://homepage.ntlworld.com/s.castledine/greenfuz/wah.html
It is my goal to bring you the Best Wah inductor money can buy, backed with the
best customer service
out there. Feel free to send me an email and let me know how your project turned out.
If you are having any questions or concerns please let me know.
All the Best,
Michael
Whipple Resistor Kit Mods:
The Whipple and Whipple Kit both come with 4 different resistors to help you shape
your tone.
Before you start the resistor mods please keep in mind that you are trying to get the best
sound for you. Try each one and listen to how it changes the sound of the wah, and
see if you like it. When I work on a pedal I’m trying to balance the gain, treble, mids
and bass. So each one sounds right to my ear. Don’t think that more of something is
just better, you don’t need to “turn it up to eleven,†try and balance the tone to your
taste. I have found these values are a good starting point and are by no means the
last word on what may or may not produce the “perfect tone†for you, but simply a
way to start listening.
These resistors mods are optional. I do recommend changing the 68K resistor if you
are adding a true bypass switch, this helps you retain a more even volume when the
pedal is switched between off and on.
Input Mod:
This is shown as the stock 68K resistor. I suggest this mod for anyone who is
installing the True Bypass switch. Install the 57K resistor in place here. This will
help retain a more even volume between the on and off settings.
The Vocal Mod:
This is shown as the stock 33K resistor. I suggest the 100K resistor in this spot, you
can alternately use the 68K resistor, and use the one you have taken out in place of
the 57K
Bass Mod:
The stock resistor is 390 ohm some pedals have a 470 ohm or 510 ohm.
Install the 330 ohm resistor in this spot.
By lowering this value you increase the gain and lower frequencies.
Midrange:
The is the stock 1K5 resistor (1.5 K) replace this with the 2K resistor this will bring
out the mids as well as create a more even transition to the lower frequencies.
True Bypass:
I recommend this mod for all wah pedals, at least ones that don’t already have true
bypass. The wah pedal is turned off, in stock form it will change the sound of your
guitar, by loading down your signal. You will loose both the high end of the signal
and it will also make you guitar less dynamic. This is particularly true for older wah
pedals, some newer pedals have buffers that help somewhat so the change is not as
great. But I prefer the true bypass mod, which offers the most transparent sound
when the effect is turned off.
In your Whipple kit is included a 3PDT switch. This means “triple pole, double throw.â€
If you are not already familiar with this switch it can be a little confusing. You see
there are 9 pins on the bottom of the switch. They are rectangular in shape. When
wiring turn the switch so it looks like navigate signs, (not columns) this way you
will have the wires going to the correct pins. This drawing shows how the switch
works in each position.
Notice the 3 set of pins hence the “triple pole†and the two positions AKA “double
throwâ€
This switch also allows the use of an indicating LED.
When wiring this switch for true bypass you will only need to use 6 of the 9 pins,
The other 3 are for the LED, and are not used if you are not installing an LED.
(more on that later)
Because there are many different models of wah pedals there are a few different
versions of the wiring.
Old School Wahs (60’s)
70’s-80’s Vox and Crybaby
Vox 847
Dunlop Rev.D
Dunlop Rev. E, F, G, H, I
Most of these installs are fairly straight forward in terms of what goes where. The
Green arrow is pointing to (C9) which is a capacitor. The earlier versions this part
looks a little different but the part is in the same spot. You need to unsolder just one
end of this cap, the side the arrow is pointing to. And then solder the wire to that
freed end, as shown.